Flash Shape Tweening
This lesson will teach you how to create a "shape tween" by taking two shapes and using them to morph from one shape to another and back again. Shape tweening is a term used in Macromedia Flash to refer to the transition from one shape to another.Shape Tween Setup
Before we can create our tween we are going to need the shapes that will be used to produce the tween effect. First, create a simple rectangle like the one we have below, in frame 1 of your timeline.
Inserting KeyFrames
Select frame 25 in the timeline window and insert a KeyFrame. Select frame 50 and insert another KeyFrame. Notice that there is a shaded area from frame 1 to 50. This is your "active" area and the animation is going to occur within this area.
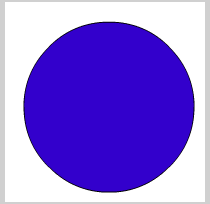
Changing Our Shapes
We want our shape to morph from one shape to another. For contrast let's have our red box morph into a blue circle.Select the middle frame, frame 25, and draw a big blue circle on top of the existing red box, so that it is completely covered. Using the Oval Tool in frame 25, hold shift, left-click and drag to create a large blue circle. Your stage should now look like this for frame 25.
Inserting the Shape Tween
In the timeline window, select any frame from 2-24 using left-click. In the Properties window you will now see an option to tween. It is currently set to none. From the Tween drop down selector choose Shape.
Now insert another KeyFrame at frame 26. Left click any frame from 27-49 and once again select the Shape Tween from the Properties window.
If you have a dotted line, rather than a solid line in your Timeline window, be sure that you followed the instructions up to this point exactly.

Tidak ada komentar:
Posting Komentar